Summary
With almost a year of Python development under my belt, I wanted to start talking about the Python elements that I feel have made my development of the PyMarkdown project successful. When thinking about where to start, the first thing that came to mind was my use of PipEnv to maintain the project environment.
Introduction
While I am relatively new to Python, I am an old hat at trying to maintain a cohesive way to keep my projects usable yet portable. From my early days in C and Pascal to my current days in Go and Java, I have always tried to have a cohesive story around how to package my project’s source code to be used by multiple developers. In the end, I found that the main goals were always the same: how do I keep a project usable by all interested developers, while keeping the maintenance of that project to a minimum?
From my point of view,
PipEnv
meets those goals for Python by solving a lot of the common issues that project
maintainers and developers have. This in turn makes two of the harder parts of
developing programs mostly disappear: dependency management and portability. Using the
simple command pip install --user pipenv to install into any Python system, PipEnv quickly became a useful tool in my toolbox and has stayed there.
During this article, I will talk about why PipEnv keeps that position in my toolbox.
Quick Note
While I realize some projects may still be on Python version 2, this article is targeted for people developing on Python 3 and above. More precisely, these examples were all tested with Python 3.7.
What Is PipEnv?
While the full answer can be seen at the top of the PipEnv home page, my summary of that answer is as follows:
PipEnv is a Python module that cleanly manages your Python project and its dependencies, ensuring that the project can be easily rebuilt on other systems.
While that might seem like an easy thing to accomplish, PipEnv or tools like it are usually only employed after a journey through other, less efficient solutions.
To understand those solutions and the problems that they present, let’s start at the beginning with dependency management.
Starting with Dependencies
In Python, as with most modern languages, a lot of the heavy lifting is done in
libraries. For Python, these libraries must be installed directly into the current
instance of Python for those libraries to be visible to the Python programs. The most
common way of installing and managing those libraries locally is to use the
pip
tool. For example, to add the latest version of the colorama library to the local
Python installation, the following command is used:
pip install colorama
But that command has a problem in that it installs the specified library into the global instance of Python. Even addressing that problem using a user-specific variation of that command:
pip install --user colorama
that caching still takes effect for all Python programs that are run as that user. That is a bit better, but not optimal.
The big issue is that it is hard to replicate which libraries are installed for any given project without maintaining a per-project script with many lines in it, one for each library. With multiple projects sharing the same global cache of libraries, a clear way to enforce the libraries and versions needed for a specific project is needed.
Enter the requirements.txt file.
Explicitly Specifying Requirements as Code
The first step that many people take on their Python project journey is to create a
requirements.txt file to hold all the library requirements for their project. The
file has a format of:
colorama=0.4.3
Pygments==2.4.2
with each library being listed on its own line, optionally followed by the version of the library to install. To apply these library requirements to a given Python environment, the command:
pip install --user -r requirements.txt
is used. This usage of pip is used as a shortcut for having to call pip install
once for every library needed in the project. By
this point in the project process, most developers understand that nailing down a
specific version of the library being used is critical to the project’s success. By
specifying an exact version of the library to be referenced, the pip tool guarantees
that it will always reference that specific version of the library, locking down the
behavior of the library and making it predictable.
While the tool usage is simple enough, there are problems with using the pip tool
in this way. The first problem is that to ensure that I have the right libraries for
my program, every time I run that program, I need to re-run that
pip install --user -r requirements.txt command before I run my program. If I do not
run that command, I risk the chance that another program has changed
the libraries on my program, either causing the program to fail or rendering its output
questionable. Even when I created a script to run the above command and my program
together, I felt that the combination often feels slow, bothersome, and inelegant.
The second problem is that of “phantom” dependencies. For argument’s sake, let’s assume
that I am maintaining 2 projects and their dependencies. Project A has a dependency
on Library 1 and Project B has a dependency on Library 2, with Library 1 and
Library 2 being separate libraries. Furthermore, let’s assume that both
projects use a requirements.txt file and the above pipenv install method to manage
their project
dependencies. Because of the way these files are applied, if Project B is used after
Project A, it retains access to Library 1 that was installed by Project A. After
all, with nothing to remove Project A’s dependencies, they stay in the user’s global
cache of libraries. This means Project B’s dependencies are not clearly defined and
may prove difficult to replicate on someone else’s machine.
Given those problems, how can the project move away from using global library caches?
Another Step Forward: Virtual Environments
The next step forward is to use the tools accumulated so far and to add virtual environments into that group of tools. Installed using the following command:
pip install --user virtualenv
the user can then run the following command to create a virtual environment under the current directory:
virtualenv venv
This command may take some time to complete, but once it is done, there will be a local
virtualenv directory that contains a completely distinct version of the Python
installation that it was created from.
Even with that environment in place, there is some work to do before executing the
project’s Python program. To use the virtual environment, the execution of an
activator script is
required to set the shell’s environment to point at the correct environment.
Located in either the
virtualenv\Scripts directory (on Windows systems) or the virtualenv\bin directory
(on Posix systems) are a group of scripts with the name activate or matching the
pattern activate.*. Executing the correct script activates the virtual environment
for a given shell, isolating any changes to the Python environment into that
virtual environment.
The usage of this tool seems beneficial so far, so what are the issues with this tool?
The
big issue for me is that you must remember to deactivate the environment before
leaving the project folder. If you do not deactivate the environment before leaving the
project’s directories, you can be doing something else in another directory and forget
the directory that you anchored that environment to . Without noticing it, a simple
pip install command will then alter the requirements of that environment, and not of
the environment in the current directory. This is a realistic scenario. In my early
days of Python development, I did this numerous times! And each time, it took a while to
figure out what I had done and how to reverse it.
A smaller issue with these environments is that they are specific to the local system
but are anchored within the project. This means that when dealing with version control
systems such as Git, the project needs to explicitly ignore the files in the project’s
virtualenv directory to prevent local environment files from being committed.
However, even with that directory ignored, the project requires extra scripts as part
of its project code that specify how developers need to create the required virtual
environment.
Given those issues, how do we take the best parts of pip and virtualenv and merge
them together?
Enter PipEnv
Installed using the following command:
pip install --user pipenv
PipEnv combines the best aspects of the previous concepts while getting rid of a fair
number of the problems. To illustrate this, I created a sample project from scratch to
say, “Hello world!” Setting up the project was easy. I created a new directory,
changed my current directory to that directory, and entered the command:
pipenv --three
It took a while for the command to complete, but upon its completion I had a directory
that contained the file Pipfile and a “hidden”1 virtual environment. To see
the location of that virtual environment, I entered the command:
pipenv --venv
and PipEnv returned the path to the virtual environment. To be specific, it created a virtual environment that was not in my project directory, but in my local system’s user space. This meant that the virtual environment directory did not show up in any scans of the project directory, meaning that I did not have to ignore that directory by any version control systems. That was definitely a win!
From there, I decided I wanted to add a splash of color to the program, brightening up a normally dull Hello World program. While a simple Hello World program would look like this:
print("Hello World!")
I decided to go with using the colorama library to add that color. Installing the
colorama library to the current project was easy, using the following command:
pipenv install colorama
That command looked for the latest version of the colorama library, installed it in
the virtual environment, updated the Pipfile and generated a new Pipfile.lock file.
Once that was completed, I created the file main.py with the following contents:
from colorama import init, Fore, Back, Style

init()
print("Hello " + Fore.BLACK + Back.GREEN + "World!" + Style.RESET_ALL)
and saved that file. After a quick check for spelling and grammar mistakes, I executed that program with the command:
pipenv run python main.py
and I was greeted with this response:

To be clear, with 3 commands and 3 lines of Python code, I was able to create a simple program that referenced a library to colorize the output for my simple program and to write a single line of text to the console. An even bigger win for me was that I knew that if I needed this project to be portable, I could easily bundle up the source in the directory and recreate the project elsewhere. Having used PipEnv for months, this was not a theory for me, this was something that I have done in practice multiple times.
But unless you have performed that action, it may be hard to appreciate. So let’s prove it!
Proving That the Project Really Is Portable
To prove that the project is portable, I created a separate directory and copied the
contents of my sample directory into that directory. While that is not exactly what
happens when I clone a project from Git, I believe it is a close enough estimate for
the purpose of this example. To be specific, there were only 3 files in the source
directory for my sample project, and all of them were copied over: main.py,
Pipfile, and Pipfile.lock.
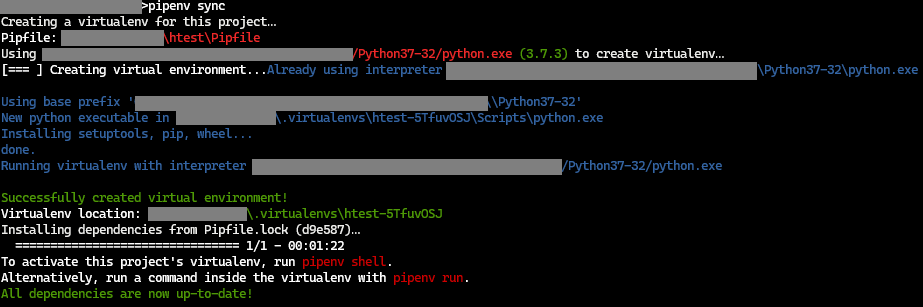
To properly setup the project, I entered the directory and executed the command:
pipenv sync
After a while, control returned to my shell, with the pipenv output clearly detailing
that it created a new virtual environment and downloaded the needed libraries.
From there, entering the command:
pipenv run python main.py
yielded the same output as the example project in the original directory.
While the
typical project will be more complicated than this small project, the underlying
principles are the same. If a project uses PipEnv to manage library dependencies,
the Pipfile and Pipfile.lock files become part of the project’s source and
allows the project’s dependencies to be replicated in another directory or on another
system.
Satisfied with the portability test passing, and not wanting to be a bad consumer of system resources, I then used the following command to remove the virtual environment from my local machine:
pipenv --rm
By using the pipenv --venv command both before and after this command, I was
able to verify that the directory containing the virtual environment was removed from
my local system.
Why Do I Like It?
I like using PipEnv because it is simple to setup, simple to maintain, and easy to use. I am lazy in that I want to have the right tools at my fingertips to do the simple and easy stuff for me. Having to remember to activate a virtual environment when I go into a directory and deactivate it when I leave was a headache. There were many times I forgot to do just that, and it caused a bit of chaos.
I feel that PipEnv keeps everything I need together and keeps it in the right place
for me: the base of the project. If I need to run a Python script from the project,
I use pipenv run python {script-name}.py, a format that makes sense to me. If I need
to check the project’s dependencies, the pipenv graph command is there, with an
intuitive output format. If I need to recreate the project in a new directory, the
pipenv sync command is there, and completes its job properly
Basically, it is a tool that I find useful and that I think makes sense.
Wrap Up
While there are options out there on how to maintain Python projects, the one that I prefer is PipEnv. Newer options exist, such as Poetry, but for projects that I rely on, I want something that has been battle tested thoroughly.
I feel that PipEnv is the best option that easily meets my requirements.
-
You’ll have to take my word that the output was the same. I am using the same picture for both, but that is only because the output was the same. ↩
Comments
So what do you think? Did I miss something? Is any part unclear? Leave your comments below.